Introduction
Welcome amigo!
I created this wiki just for documenting some of the stuff that I have learnt. I use it as a quick reference to save time and kind of avoid relearning things. This whole wiki is specifically made for myself - so not everything in here is explained in detail and some of the pages may even contain mistakes.
Of course, if you have any questions or spot any mistakes, you are always free to contact me
What's on my Phone
Just some of the apps that I use my phone. I am not including every single one just the apps that I find useful.
Btw, I am an Android user and I use the OnePlus 7 as my daily driver.
-
In short, Raindrop is a cross-platform bookmanager with synchronisation so that I can access my bookmarks anywhere. I discovered Raindrop after watching MKBHD's What's on my Phone video and I really wanted to try it out. After using it for a couple of days, I thought to myself, how did I not use a bookmanager like Raindrop earlier.
I use it to save articles,posts from reddit,memes, youtube video links and much more. Basically, anything I want to refer to later, I just save it to Raindrop.
-
Seal is a video/audio downloader based on yt-dlp. The app is really good. I love how quick and easy to use it is. The UI is pretty awesome too. You can download it from F-droid or directly from GitHub
-
Paisa is a an expense and budget tracker. The app does a pretty good job but I think it is pretty overkill for an expense and budget tracker. I might switch from it to a more simple budget tracker. But until then, I am just going to keep using this app.
-
I use Obsidian for journalling. I love the offline approach of Obsidian and data doesn't leave my device.
-
I play the keyboard (Beginner) at my church and I needed something to keep track of the songs sung by our choir, so I found it really easy to set up a database in notion and also published it as a page on the web.
Push an existing local repository to GitHub
How to push an existing local repository to GitHub
Make sure the default branch name is 'main'.(main is the default branch name in my case.)
-
Create a new repo on GitHub. The repository should be empty.
-
Copy the URL of the repo on GitHub
-
Add the copied URL as remote URL.
git remote add origin REMOTE-URL -
Push the repo
git push origin main
Useful Git Commands
git log --oneline
git log --onelinecan be used to see the list of commits in a repo
git reset --hard HEAD~1
- Used to reset the most recent commit.
- All staged and unstaged changes are destroyed.
git reset --soft HEAD~1
- All changes from the removed commit remain staged
- But commit goes back by 1
git stash
- If you are working on a branch and you need to switch to another branch to work on something else, then git will not allow you to do so if you have uncommittedd changes.
- In such a situation,
git stashcan be used to temporarily save uncommitted changes. It reverts your directory to the last committed state.
Use git stash when you want to record the current state of the working directory and the index, but want to go back to a clean working directory. The command saves your local modifications away and reverts the working directory to match the HEAD commit.
- Use
git stash popwhen you are ready to add the changes back to your code
git commit -am
-
Instead of using
git add .thengit commit -m "commit message", you can usegit commit -am "message"
View git remote URL
git remote -vto view the remote URLs of a repository.
Some Tips
-
If you are a CS student, learn how to use git.
-
Don't waste your money on pointless internships and certifications.
-
Doing an internship where you have to pay money out of your pocket is a scam and best not to do it. (Speaking from experience.)
-
First year of Engineering is difficult (But it depends on person to person), study well during this time. Work hard.
-
If you find a subject difficult to understand and you think you are going to fail then ask for help from your friends or go to tuition (there is nothing embarrassing about it). Don't be lazy and fail the subject on purpose.
-
YouTube,ChatGPT & the world wide web are your friends, use the resources available to learn stuff.
-
If you do fail a paper, it is not the end of the world. Work hard and clear the paper in the next semester.
-
Don't get into any stupid fights and don't do anything that might get you suspended from college.
-
Does CGPA matter? Well, the answer can be Yes/No. But if you are looking to get placed, then having a CGPA above 7.5 is good. If you can get your CGPA above 8,even better.
-
Perform well and get good marks on internals or just enough marks to pass internals.
-
Regardless of your branch(CS,Mech,Civil...), It's always to good know a programming language such as Python, C, etc.
-
If you are willing to put in the effort, you can pass sem exams even if you start studying a few days before the exam or during study leave.
-
If you can, try to do an actual internship (like the one where you get paid) in the final year. (I couldn't do it but this is a great thing to do. You will learn a lot.)
-
During placement drives, prepare for aptitude test and practice questions.
-
Having a strong grip over the basics. If you know Python, you should know it's basics too. In technical interviews, you will be asked mostly about the basics.
-
Have a boatload of fun with your friends.
-
You should try using Linux instead of Windows.
Useful Stuff for KTU
A collection of playlists, youtube videos and channels and websites that I use for studying.
Subreddit
r/KTUKerala - unofficial subreddit for KTU Students. It's a decent place for asking questions and having discussions.
Previous Year Questions
- PYQs can be found on PrepKTU
S1 & S2
For first year, I mostly referred to the prescribed textbooks.
Engineering Mechanics
- Learn with Josy
- KTU Engineering Mechanics Textbook
Engineering Physics
S3
DSA (Data Structures & Algorithms)
LSD (Logic System Design)
OOP (Object Oriented Programming) in Java
- Head First Java: A Brain-Friendly Guide This is actually a really good book that I found helpful. All the important concepts are explained in simple language with plenty of examples. The book was pretty fun to read.
S5
FLAT (Finite Language and Automata)
S6
Computer Graphics
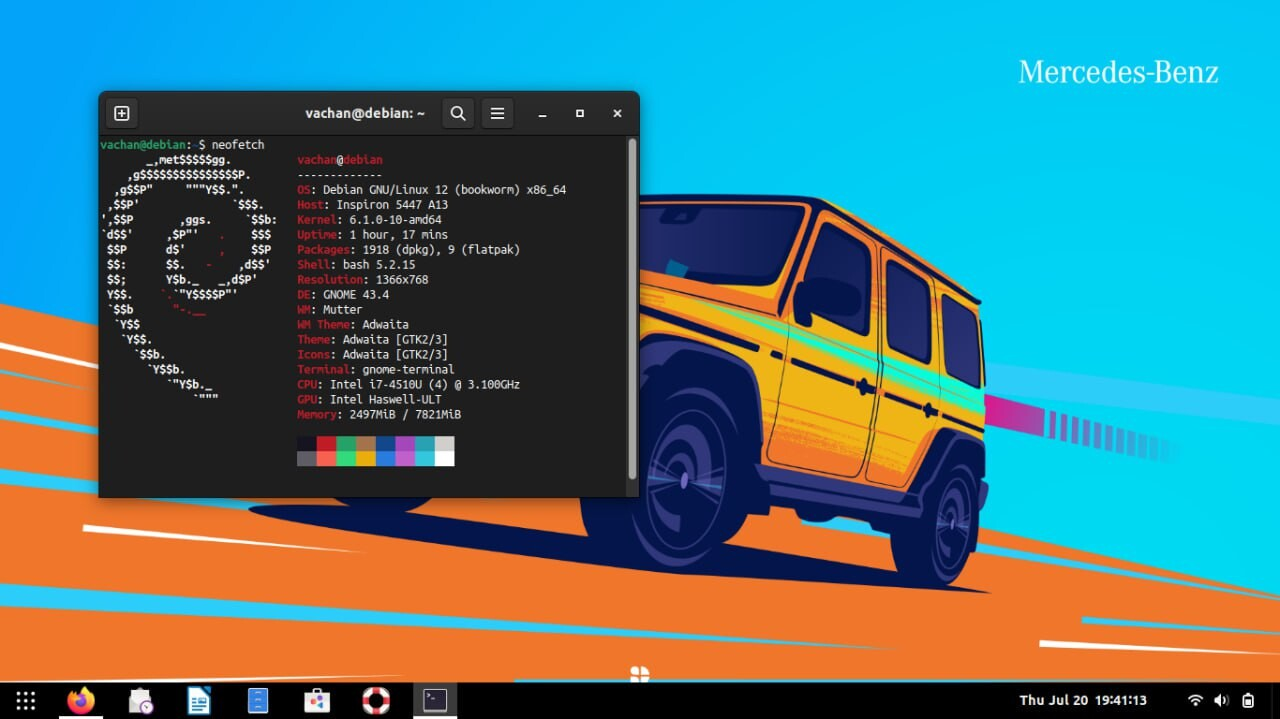
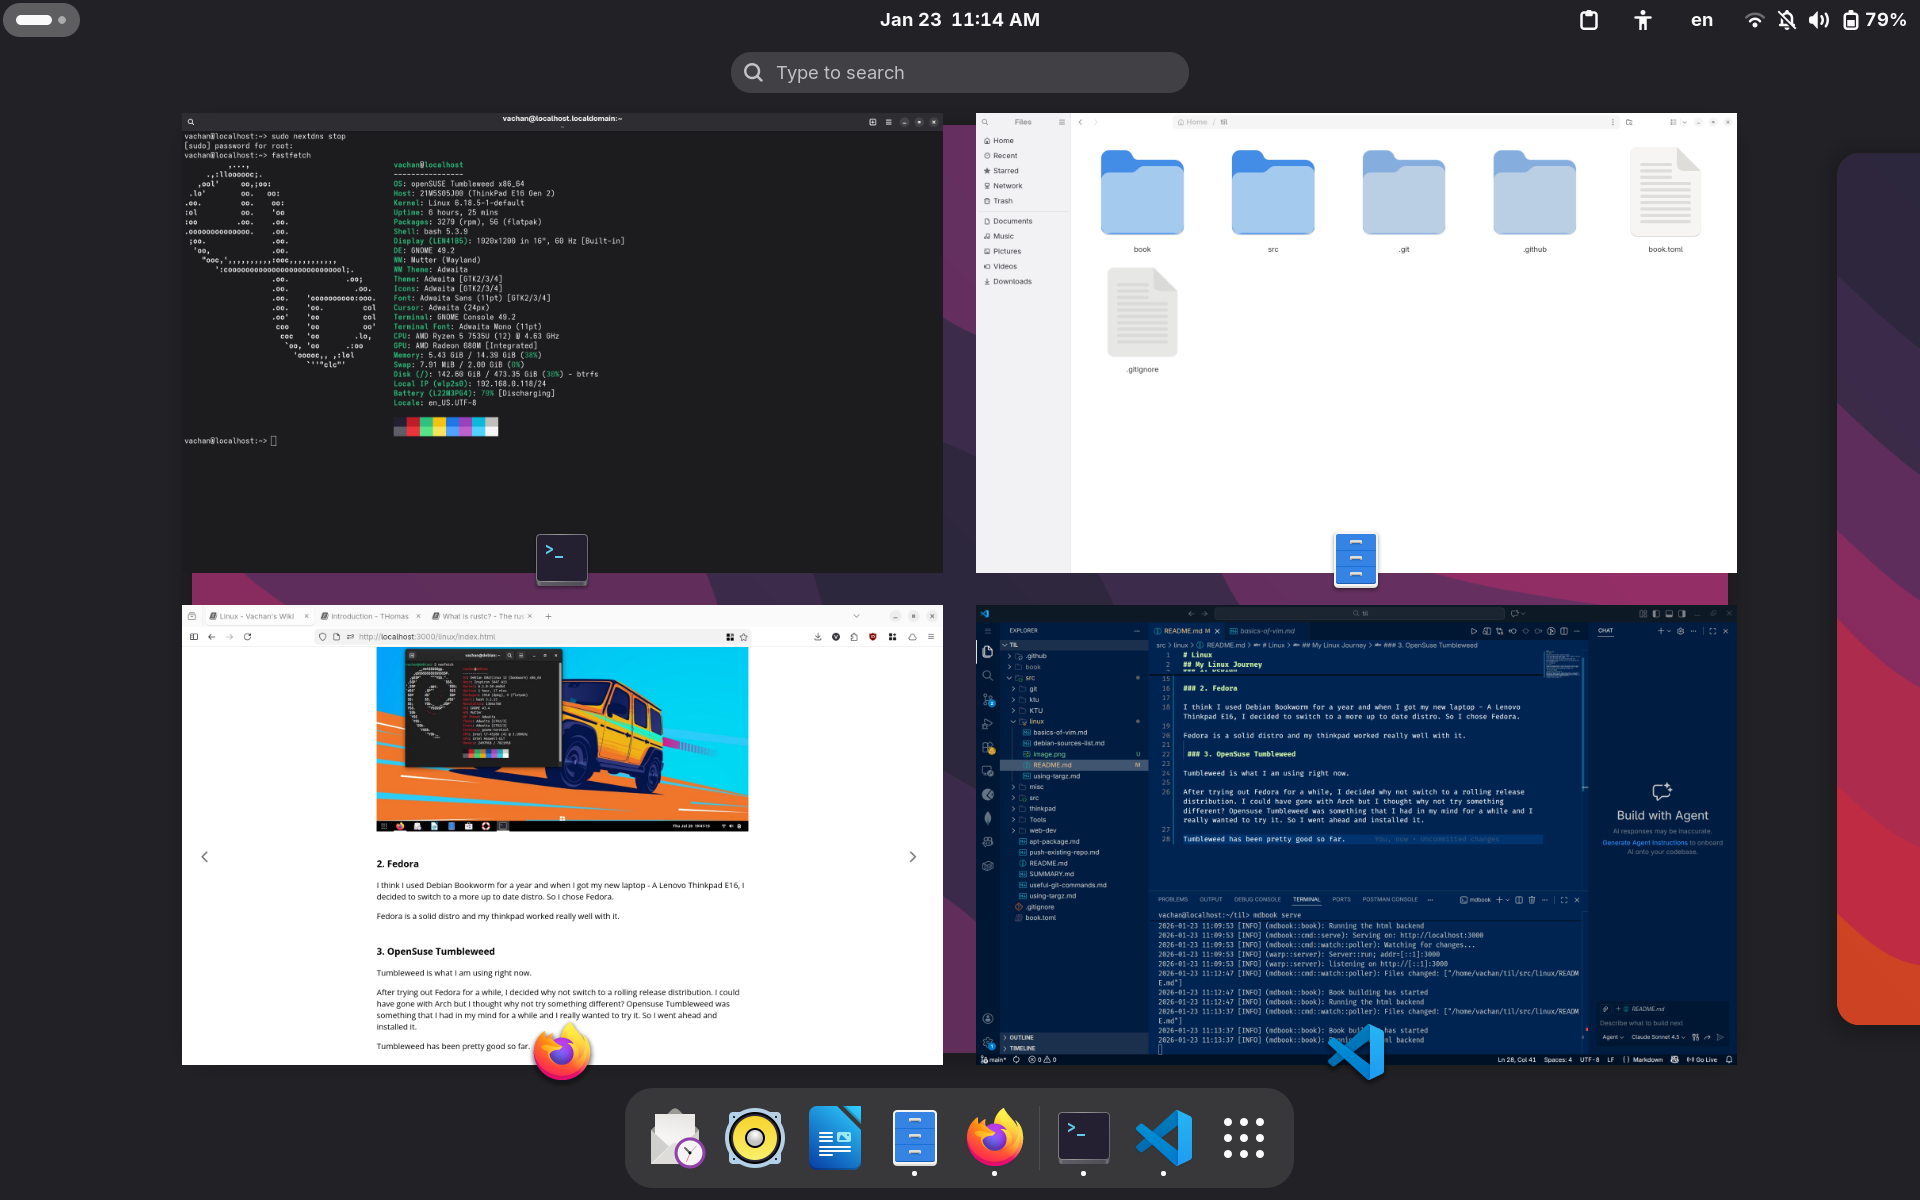
Linux
My Linux Journey
1. Debian
Debian is the first distro that I installed on my computer.
I got tired of Windows 10 and decided to switch to Debian 12 (bookworm) in the month of July of 2023. No dual-boot. Just only Debian.
I used a Dell Inspiron laptop at the time and the hardware worked really.
Not only that Debian is a rock solid distro and I didn't face any big issues while using, everything worked well.
2. Fedora
I think I used Debian Bookworm for a year and when I got my new laptop - A Lenovo Thinkpad E16, I decided to switch to a more up to date distro. So I chose Fedora.
Fedora is a solid distro and my thinkpad worked really well with it.
3. OpenSuse Tumbleweed (Current Distro)
Tumbleweed is what I am using right now.
After trying out Fedora for a while, I decided why not switch to a rolling release distribution. I could have gone with Arch but I thought why not try something different? Opensuse Tumbleweed was something that I had in my mind for a while and I really wanted to try it. So I went ahead and installed it.
Tumbleweed has been pretty good so far and I haven't faced any major issues so far. It's works pretty well considering it is a rolling release.
Desktop Environment
Gnome
Gnome is the desktop environment of my choice. I love how clean, minimal and polished it is. Gnome just looks so good and I love the MacOS style it has.
Yes, I know how a lot of people just hate Gnome and I totally understand you guys. But I love gnome and it's enough for me.
Yes, I have tried KDE Plasma but it's just full of way too many options and customizations that I really don't need. Whenever I installed Plasma, I always felt like going back and installing Gnome.
Yeah so Gnome is my favorite distro.
Using tar.gz
I decided to try out the jetbrains applications. This is how I use the tarball.
Once the file is downloaded, you have to extract the file. The application can be launched by executing the ./bin/ WebStorm.sh script.
But it is much easier to launch the application by adding the directory to the PATH
-
Extract the file
-
Add directory to PATH
nano ~/.bashrcexport PATH=$PATH:/path/to/directory/ -
Reload the shell environment
source ~/.bashrc
apt package manager
Search for a package
To search for a package from the command line, use:
apt-cache search keyword
Show package details
To show package details, use apt show package-name.
Basics of Vim
I just put this here so I can for future reference. Of course, there are many cheatsheets and guides on how to use vim. This is just my personal cheatsheets. I am not planning on adding every command, only just some useful ones.
If you find any mistakes here, please let me know.
Additional Reference
Start
Vim has basically four modes:
- Normal Mode (Command Mode) - the default mode.
- Command Line Mode - Play around with commands
- Insert Mode - for editing the contents of the file
- Visual Mode - for selecting the text.
How to enter each modes?
- Press
Escto enter normal mode. - Press
ito enter insert mode. - Press
vfor visual mode. - Press
:to enter command line mode.
Saving and Quitting
Enter command mode
- Use
:wto save the file - Use
wqto save and quit - Use
q!to exit the file without saving changes made to the file - Use
qif no changes were made.
Cursor Movements
h- to move leftl- to move rightj- move cursor downk- move cursor upG- to move to the last line$- to move to the end of a line
More commands for insert mode
o- insert new line after the current lineO- insert line before the current linea- insert after cursori- insert before cursorA- insert at end of lineI- insert at beginning of line
Undo Redo
u- UndoCtrl+R- for redo
Set line numbers or relative line numbers
set number- to display line numbersset relativenumber- to display relative line number
Debian Mirrors
The sources file is located at /etc/apt/sources.list. More info on the sources.list file can be found on the Debian Wiki.
Mirrors that I use:
More mirrors can be found on the Free Software Mirrors in India page.
Check if port is in use
To check which ports are in use and find which application is listening to which port. Use the following command:
sudo ss -tulpn | grep LISTEN
The command options are:
-t:TCP Ports-u: UDP Ports-l: listening sockets-p: process using the port
Thinkpad
I use a Lenovo ThinkPad E16 Gen 2 (AMD) with Fedora as my Operating System.
Operating System
- Fedora 41 Workstation
- GNOME Desktop
Specifications
- Processor AMD Ryzen™ 5 7535U Processor (2.90 GHz up to 4.55 GHz)
- Graphic Card Integrated AMD Radeon™ 660M
- Memory 16 GB DDR5-4800MHz (SODIMM)
- Storage 512 GB SSD M.2 2242 PCIe Gen4 TLC Opal
- Display 40.64cms (16) WUXGA (1920 x 1200)
- IPS, Anti-Glare, Non-Touch, 45%NTSC, 300 nits, 60Hz
- Camera 720P HD RGB with Microphone and Privacy Shutter
- Battery 3 Cell Li-Polymer 47Wh
- WIFI Realtek 8852BE WIFI 6 2x2ax + BT5.x & Bluetooth® 5.1 or above
More information can be found in the PSREF
Charging Thresholds
To extend the lifespan of your battery, you can define charging thresholds.
A ThinkPad battery can be set for maximum runtime (hours), or for maximum lifespan (years).
Setting the Charging Thresholds
Source: Reddit
-
You can set the charging start threshold in (At what value or below should charging start):
/sys/class/power_supply/BAT0/charge_start_threshold -
You can set the charging stop threshold in (At what value charging should stop):
/sys/class/power_supply/BAT0/charge_stop_threshold -
I have set the start threshold at 75 and stop threshold at 80 on my laptop
Optimizing for runtime (hours)
Source: Lenovo
The normal default Lenovo Power Manager Battery Maintenance setting keeps the battery fully charged. The setting starts charging when the battery drops below 96%, and stops at 100%. The battery runtime depends on the Power Plan settings.
Optimizing for lifespan (years)
Source: Lenovo
For maximum lifespan when rarely using the battery, set Custom charge thresholds to start charging at 40% capacity and stop at 50%, and keep the ThinkPad cool. The thresholds can be adjusted in the Battery Maintenance settings of Lenovo Power Manager.
If the battery is used somewhat frequently, set the start threshold at around 85% and stop at 90%. This will still give a good lifespan benefit over keeping the battery charged to 100%.
Swap Fn and Ctrl Key
On thinkpads for some reason, the function and control keys are in a different position. I have no clue why Lenovo does this.
Anyway, if you prefer, you can swap the keys by using the BIOS. Please refer this article by Lenovo to swap the function and control keys.
Linux Installation
You can install any distribution on your laptop. In my opinion, it is better to go with Fedora or Ubuntu to make sure the hardware works as intended.
Update System and BIOS
- Before getting rid of Windows, update the BIOS using Lenovo Vantage software. For more information, visit Lenovo's website
Disable Bitlocker Encryption
If BitLocker encryption is enabled, please disable it before following the below steps.
You must disable bitlocker encryption to install Linux and backup your keys
- Lenovo Bitlocker Encryption Page
- Guide from Lenovo on how to disable bitlocker encryption
- Guide from Its FOSS - This guide also contains on how you can backup your recovery key
Secure Boot
What is Secure Boot?
UEFI Secure boot is a verification mechanism for ensuring that code launched by firmware is trusted. More info can be found in the Ubuntu Wiki
Enable Secure Boot
Source of Instructions: Lenovo
- Reboot your PC
- Boot into the BIOS setup menu by pressing the F1 key when the Lenovo logo is displayed
- In the BIOS menu select the “Security” option and the “Secure Boot” sub-menu. Toggle the “Allow Microsoft 3rd party UEFI CA” to be “On” as shown below.
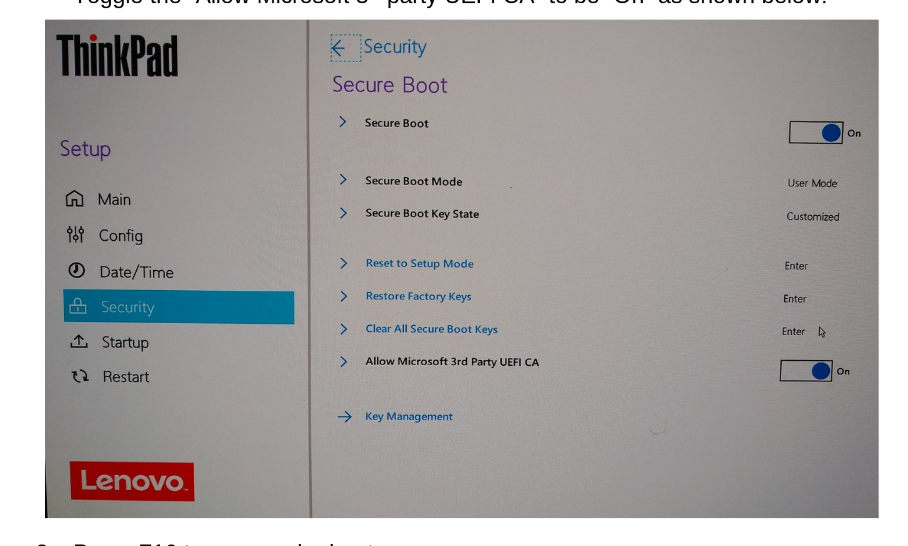
- Press F10 to save and reboot
Linux Install
- Flash the ISO on to a USB using Rufus, Balena Etcher or the software of your choice (Since I use Fedora, I used Fedora Media Writer)
- Take your freshly written USB key and insert it in the powered down installation platform.
- Power on the device and press F12 during early boot to enter the Boot Menu.
- Navigate down to the USB HDD device and press Enter.
- Select the appropriate option from the GRUB Menu (In my case it was Test this media & start Fedora-Workstation-Live.)
Updating the BIOS
Please also refer to the references used to write these instructions
But on Linux distributions, Lenovo Vantage is not supported and since Thinkpad 16 G2 (AMD) is not Linux certified, you cannot get udate the BIOS using fwupd.
You can manually update the BIOS by downloading the image and flashing it on to a USB Drive.
-
Download the BIOS image from Lenovo Support. Make sure you choose the correct model. You should download the CD ISO image.
-
Download geteltorito
-
Change directory to geteltorito
-
Set permissions by using the below command
chmod +x ./geteltorito.pl -
Extract the bootable image from the ISO:
./geteltorito.pl -o bios.img iso_file.iso
sudo dd if=bios.img of=/dev/sdb
You now have a bootable USB drive.
Secure boot must be disabled it for the computer to boot the USB drive
ffmpeg
-
Convert all the files in a particular directory to another format
- For Linux and macOS this can be done in one line, using parameter expansion to change the filename extension of the output file
for i in *.avi; do ffmpeg -i "$i" "${i%.*}.mp4"; done
- For Linux and macOS this can be done in one line, using parameter expansion to change the filename extension of the output file
scrcpy
scrcpy (screen copy) is a tool used for mirroring and controlling your Android device via ADB. I found this tool particularly useful when I cracked the display on my phone and touch did not work properly.
To use scrcpy, you will need to enable USB Debugging on your device
You can download scrcpy from GitHub. To install it on Linux, see the following page.
- To control the device using your keyboard and mouse (without Android Debugging). Use the following command.
scrcpy --otg
- To mirror the device and control the device, simply run the following command
scrcpy
- Use with the screen off
scrcpy --turn-screen-off --no-cleanup
Screenshot

ytdlp
-
Download a video from YouTube as mp3
yt-dlp --audio-format mp3 --add-metadata https://www.youtube.com/watch?v=r5PtlHs9igM -
Download video without audio
yt-dlp youtube_link -F
pdftk
Merge Multiple PDFs into a single PDF
pdftk file1.pdf file2.pdf cat output output.pdf
Syncthing
I use syncthing to sync files between devices.
Note: On mobile, make sure syncthing is actually running. I was puzzled to find why syncthing wasn't running on my phone after I had installed it. Since battery saving mode was ON, the service hadn't actually started running. Just keep this in mind, if syncthing doesn't actually connect or sync properly.
Syncthing supports encryption for folders shared with devices. The data in the folder will be encrypted using a password and also can be decrypted using the same password.
For more info, refer to the syncthing docs
For decrypting the folder, use the command:
syncthing decrypt --to <plaintext-destination> --password <your-password> <encrypted-folder-path>
systemd
Start a service
systemctl start <service-name>
Stop a service
systemctl stop <service-name>
Restart a service
systemctl restart <service-name>
Reload a service
systemctl reload <service-name>
Enable service at boot
systemctl enable <service-name>
Disable service at boot
systemctl disable <service-name>
VS Code
VS Code is the text Editor of my choice.
Extensions I use
CSS
Improving CSS Reset
How you can make your site a little bit more better by using the css below. Source
h1,
h2,
h3,
h4,
h5,
h6 {
  text-wrap: balance;
}

p,
li,
figcaption {
  text-wrap: pretty;
  max-width:65ch;
}
Dark Theme
How to add dark theme to a website using only css.
@media (prefers-color-scheme: dark) {
  img {
    opacity: .75;
    transition: opacity .5s ease-in-out;
  }
  img:hover {
    opacity: 1;
  }
}
Virtual Environment (venv)
Linux
I sometimes forget how to create a virtual environment when workinng on something.
To create a venv on Linux:
python3 -m venv venv
To activate the venv:
source venv/bin/activate
To deactivate the venv:
deactivate
Create a venv for a particular python version
Just specify the version number that's all.
python3.10 -m venv venv
Setting up a Printer with EG8145V5
How to set up a printer on Huawei EG8145V5 rotuter?
This guide focuses on Linux users but even if you are a windows user - you can follow this video
- First connect the printer to the USB port and turn on the printer.
- Access the router gateway (192.168.18.1) in your browser. You may have a different gateway address....see the back of your router.
- Enable printer and storage sharing. Note the name of the printer as you will need it. You need to press the icon of of USB port to access the below settings. See image below.

- Open CUPS by going to
http://localhost:631in your browser. - Go to the administration section and add the printer
- Choose
Internet Printing Protocol (ipp)
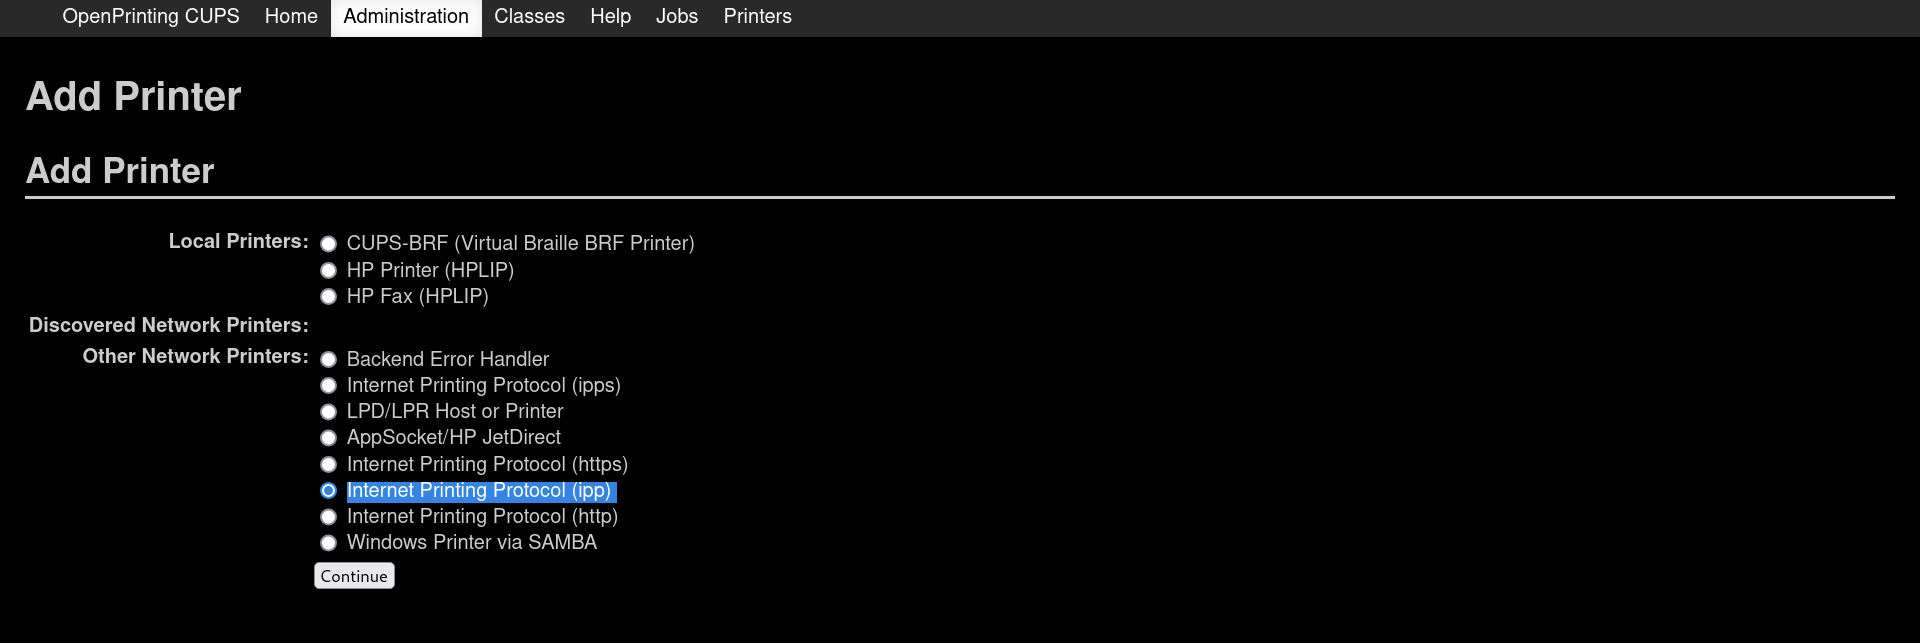
- Enter the url as
http://192.168.18.1:631/printers/name_of_printer. Replacename_of_printerwith the name you noted down earlier from the router's gateway. - Choose the manufacturer of your printer. On the next page choose the correct model and try printing a test page.
- Your printer should be working.